In case you need to update data without refreshing your browser you've got different options. One of them is polling, which means continuously requesting data from the server. In case you haven't access to sockets polling is a neat and simple way to update data without any user interaction required.
Polling vs. WebSockets
Before diving right into how to implement polling in Angular let's take quick glance at the difference between polling and sockets. I've always liked the approach of explaining it via the analogy of a dialog between client and server.
When polling data the dialog would be:
[10:00:00] Client: Is there something new?
[10:00:00] Server: No.
[10:00:05] Client: Is there something new?
[10:00:05] Server: No.
[10:00:10] Client: Is there something new?
[10:00:10] Server: Yes.
The client (in our case most likely our JavaScript) is "asking" the server in a defined interval for new data. It may even happen that there is new data but we're getting the data a few seconds later, which means polling is not really realtime.
On the otherhand WebSockets work differently:
[10:00:00] No communication between client and server.
[10:00:05] No communication between client and server.
[10:00:10] Server: Dude, there's new data!
[10:00:10] Client: Yeah!
In this case it's the other way round; instead of the client permanently asking for new data the server is simply informing the client whenever new data is available. Data is (very likely) received instantaneously - or in other words this approach is realtime.
From a logical perspective of view the sockets approach do indeed make more sense. Remembering the time when my mother cooked for me she would have probably killed me if I'd asked every five seconds "Is dinner ready??" instead of me simply waiting for her to tell me "Dinner is ready!".
So, why to use polling? Often you just don't have access to sockets. When working with Node you can simply use socket.io to make use of sockets. PHP on the other hand makes it a bit more complicated, especially since the way PHP works isn't the best choice for such things. To compensate for this polling is often enough to simply update things on your client without having to refresh or require any other interaction. Keep in mind that if you're going to implement realtime applications (chats, collaboration tools, ...) sockets are most likely the way to go.
Our application
To show how polling is working in Angular we're going to implement a simple application which gets some tweets from Twitter.
System prerequisites
The example application was implemented using the following package versions:
PHP
v7.0.28
Angular CLIv6.0.3
rxjsv6.1.0
TypeScript2.7.2
You can find all used package versions in the package.json respectively the composer.json in the GitHub repository.
Server
We're going to use the twitter-php library to keep this as simple as always.
// server/index.php

<?php
require_once 'vendor/autoload.php';

// Allow getting data from our API
header('Access-Control-Allow-Origin: *');

// Set our response to JSON
header('Content-type: application/json');

try {
    $twitter = new Twitter('<YOUR TWITTER CONSUMER KEY>', '<YOUR TWITTER CONSUMER SECRET>');

    // Search twitter for tweets
    $response = $twitter->request('search/tweets', 'GET', [
        'q' => 'javascript',
        'lang' => 'en',
        'count' => 5
    ]);
} catch(TwitterException $e) {
    $response = ['error' => $e->getMessage()];
}

exit(json_encode($response));
Of course you need to replace <YOUR TWITTER CONSUMER KEY> and <YOUR TWITTER CONSUMER SECRET> with proper values. To get these values register your application at the Twitter Application Management.
We're going to use the built-in webserver of PHP to start this file:
php -S localhost:8000
Opening http://localhost:8000 searches for tweets containing the word javascript (specified via the q key) and returns a response like:
{
  "statuses": [
    // a list of tweets
  ],
  "search_metadata": {
    // search metadata
  }
}
Done. Whenever you're requesting this you're most likely to get new tweets. Now we're going to poll this file and show some tweets.
Angular client
Implementation of our client is fairly simple.
Models
Important: Managing models will be handled the way described in my post Working with models in Angular.
For our application we're going to need three different models: one for the response, one for a single status and one for a single author. Since the hierachy begins with the response let's implement this model at first:
Note: For the sake of simplicity we're going to ignore many of the properties we're getting from our API.
// models/twitter-response.model.ts

import {Deserializable} from "./deserializable.model";
import {Status} from "./status.model";

interface SearchMetadata {
  completed_in: number;
  max_id: number;
  max_id_str: string;
  next_results: string;
  query: string;
  refresh_url: string;
  count: number;
  since_id: number;
  since_id_str: string;
}

export class TwitterResponse implements Deserializable {
  statuses: Status[];
  searchMetadata: SearchMetadata;

  deserialize(input: any) {
    Object.assign(<any>this, input);

    input.statuses && (this.statuses = input.statuses.map((status: Status) => new Status().deserialize(status)));

    return this;
  }
}
A single status is represented by the following model:
// models/status.model.ts

import {Deserializable} from "./deserializable.model";
import {User} from "./user.model";

export class Status implements Deserializable {
  id: number;
  text: string;
  user: User;

  deserialize(input: any) {
    Object.assign(<any>this, input);

    return this;
  }
}
The last model we're going to need is the one representing the user (or author):
// models/user.model.ts

import {Deserializable} from "./deserializable.model";

export class User implements Deserializable {
  id: number;
  name: string;
  screen_name: string;

  deserialize(input: any) {
    Object.assign(<any>this, input);

    return this;
  }
}
That's it for our models.
Service
Next we're going to need a service which requests the data from our API:
import {Injectable} from '@angular/core';
import {HttpClient} from '@angular/common/http';
import {TwitterResponse} from "../models/twitter-response.model";
import {Observable} from "rxjs/internal/Observable";
import {map} from "rxjs/operators";

@Injectable({
  providedIn: 'root'
})
export class ApiService {
  constructor(private http: HttpClient) {
  }

  getTweets(): Observable<TwitterResponse> {
    return this.http.get<TwitterResponse>('http://localhost:8000')
      .pipe(
        map(res => new TwitterResponse().deserialize(res))
      );
  }
}
Subscribing to our Observable will now give us an instance of TwitterResponse.
Component
The component will handle the polling using RxJS. The component will implement the OnInit interface where the polling will be started.
// app.component.ts

import {Component, OnInit} from '@angular/core';
import {ApiService} from "./services/api.service";
import {interval} from "rxjs/internal/observable/interval";
import {startWith, switchMap} from "rxjs/operators";
import {Status} from "./models/status.model";

@Component({
  selector: 'app-root',
  templateUrl: './app.component.html',
  styleUrls: ['./app.component.css']
})
export class AppComponent implements OnInit {
  statuses: Status[];

  constructor(private apiService: ApiService) {
  }

  ngOnInit() {
    interval(5000)
      .pipe(
        startWith(0),
        switchMap(() => this.apiService.getTweets())
      )
      .subscribe(res => this.statuses = res.statuses})
    ;
  }
}
interval is an observable which is piped. It's pretty obvious what happens here: every 5 seconds (starting at 0 to make an "initial call") the apiService.getTweets() is called and the components property statuses is re-assigned.
Important: In case you're using an older version of Angular your implementation would look like this:
Observable
  .interval(5000)
  .startWith(0)
  .switchMap(() => this.apiservice.getTweets())
  .subscribe(res => this.statuses = res.statuses);
Template
The last part is the template, which is just iterating over our statuses and display our tweets:
<ul>
    <li *ngFor="let status of statuses">
        <blockquote class="twitter-tweet">
            <p>{{status.text}}</p>
            by <a href="https://twitter.com/{{status.user.screen_name}}">{{status.user.name}} (@{{status.user.screen_name}})</a>
        </blockquote>
    </li>
</ul>
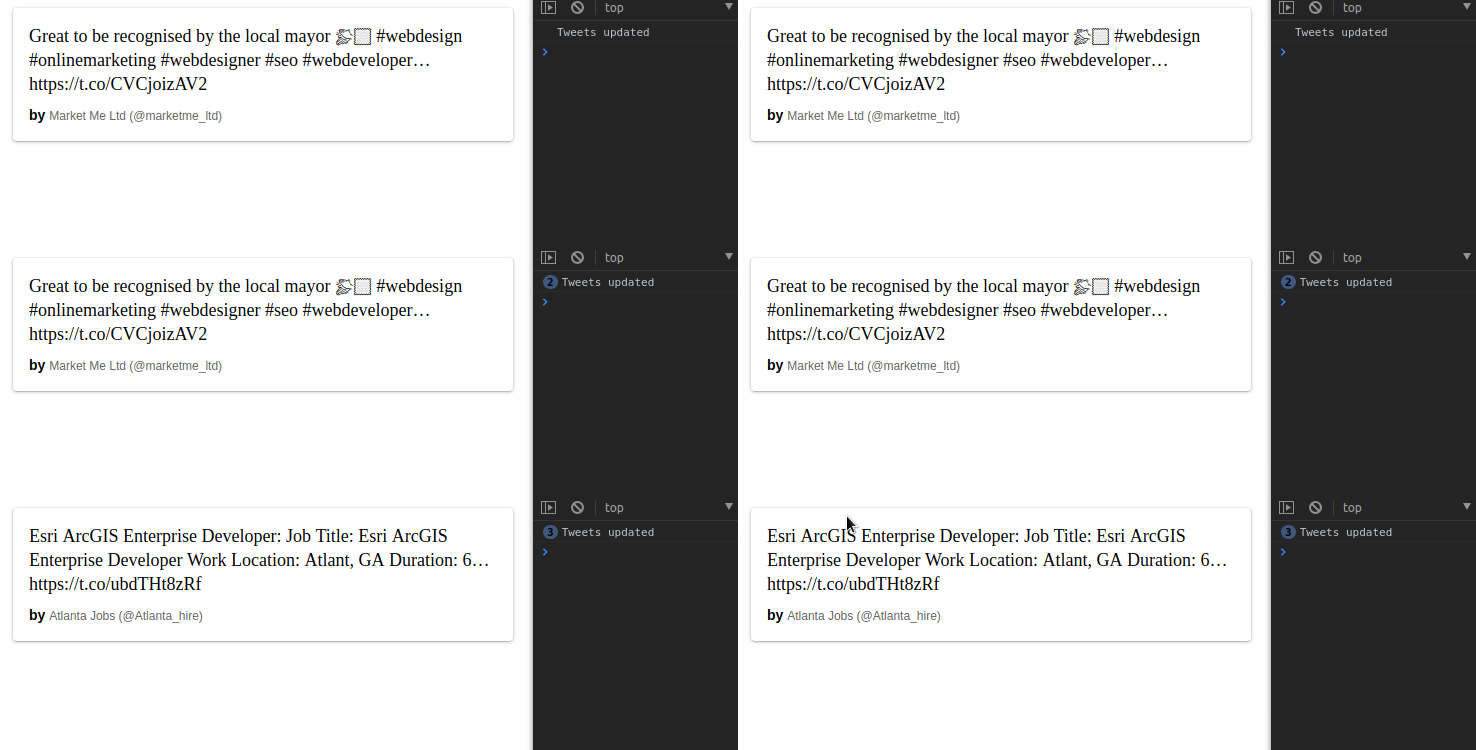
Thanks to Angular the view is updated automatically everytime new tweets are coming in:
Conclusion
As you can see it's fairly easy to do polling (with required additional tasks like updating our view) in Angular.
This technique can be used for various things like voting systems, messaging, etc.. And, as always, you can find the entire source code for this post on GitHub.
P.S.
I've promised to explain why there hasn't been a blog post for such a long time. To keep the answer to this as simple as possible: I'm no longer single.
